I starting following Myquillyn Smith (aka The Nester) on social media several years ago after reading her first book The Nesting Place. What I love about Myquillyn is that it’s not about having the perfect space or the perfect items or spending a ton of money, it’s really about making the best design decisions you can with what you have or what you can get your hands on. I wouldn’t go out of my way to say that I super enjoy or am even a little bit good at interior design (hello decision fatigue), but I do know what I prefer design-wise and I do like to feel proud of our home when we have people over. Which is why I’m here and I’m talking about it.
We live in a smaller ranch-style house that will not be our forever home, if I have anything to say about it. But it is perfect for our little family right now. If I’m being honest, I’ve been putting a project like this off in hopes that someone else can make it their own and we can move into something different that will require a little less… love. I think that is a little while off still at this point and I’ve realized that I don’t want to end up doing a ton of work right before we move for us to not get to enjoy it. What I’m hoping to tackle (with the help of a few friends and Myquillyn’s Cozy Minimalist Community on Facebook) is our living room/kitchen/dining space. The steps below are a series of steps that The Nester recommends you go through to help make sure there is a level of cohesiveness and that you’re making decisions in a way that put some of the bigger picture and ticket items first. I don’t think it’s the only way to do it, but I do think it will be fun to follow along and have seen a lot of other non-interior designer folks figure it out using the same method.
Step 1. Intention
The first step is to decide on a purpose of the room and create a dedicated pinboard. My goal is for the room to feel cozy, minimal, simple. This is a big portion of our living space and the only place we really have guests, so it needs to feel inviting and warm. You can see my Pinterest Board here but I also went ahead and pulled out my top favorites to put in a little college. I’m not married to these colors specifically, but it’s the vibe and the softness that I’m a fan of. Our living room/dining room/kitchen all very much flow together and I think part of what has prevented me from updating or changing this space is the daunting amount of work that I know it’s going to entail. In addition to the two cans of paint the walls will take, I also really want (and need!) to paint the trim which leads to me painting the kitchen cabinets since right now they are all the same shade of off-white. I’m a very clean lines and bright colors person so it very much screams dirty to me. Which is probably also is, but I digress.
Below is a more curated vision board of the furnishings I plan to use. I’ve been eyeballing that rug and *may* have already purchased the curtains before I fully had a grasp on The Nester’s recommended order of doing things. Oops!
Step 2. Quiet / Arrange
Next, we are to quiet the room by removing as much as possible (wall hangings, decor, rugs, etc). Then it’s time to arrange seating, surfaces, and storage pieces. Myquillyn normally recommends that each seat have a place to put a drink. I hope folks have long arms because I don’t see that happening in this space in this season of life. Having a toddler makes me want to hold off on the coffee table goodness for the time being and we plan to keep all the furniture we are currently using (with the exception of exchanging out the table the TV is currently on). It’s taken us a few years but I feel really good about how it’s all situated.
Step 3. Focus on the Trinity
The trinity is comprised of rugs, drapes, and lighting and this step is all about making sure we have the right number of these items as well as size, length, and temperature/visibility respectively. I haven’t quite gotten to this point in thinking about how this will turn out, but it would be a dream to change out one or two of our light fixtures – of the five in this space we have black, brown/bronze, nickel and then a more true silver. And there’s a ceiling fan in our kitchen.
As I mentioned above, I do already have our drapes. Since we’re already to this step, I’m working on a long (ideally 12 foot) curtain rod to replace the one we have. I’m hoping for black and something a little more sleek. They will be hung as high and as wide as possible. The curtains are a bit more sheer than I’d like, so i’m also trying to figure out the best way to back them before they are hung.
Step 4. Walls
The fourth step is to incorporate wall treatments, wall art, and wall sabbaths. This is also the point in which paint color should be considered. Even though I’m not quite to this step, I have a few options already in mind. I’ll make the final decision once drapes and rug are in place.
I mentioned above that I’m going to paint the trim and cabinets as well, so we’re about to have a really fun time. Here are the colors I’m considering from left to right: Snowbound (trim and upper cabinets), Basalt Powder (wall paint), Green Pasture (lower cabinets), and Urbane Bronze (accent wall).
Step 5. Accessories
The final step is to style vignettes, surfaces and shelves using Myquillyn’s vignette formulas. Then it’s time for pillows, throws, and plants. I don’t anticipate having a whole lot of accessories (toddler + two dogs) but I will hang something on the wall behind the couch for sure.
There you have it! I’m super excited to keep this project moving and can’t wait to come back with an update in a few months.
I love a good birthday tradition. Growing up, my parents made it really special for us by hanging streamers, balloons, and having our entire family over the day of for a party. In addition to my favorite foods, Mom always made a double decker circle cake (vanilla with chocolate icing) and Great Grandma made banana cake. When I moved away from home it was hard to keep up with these traditions, so they started coming here to celebrate.
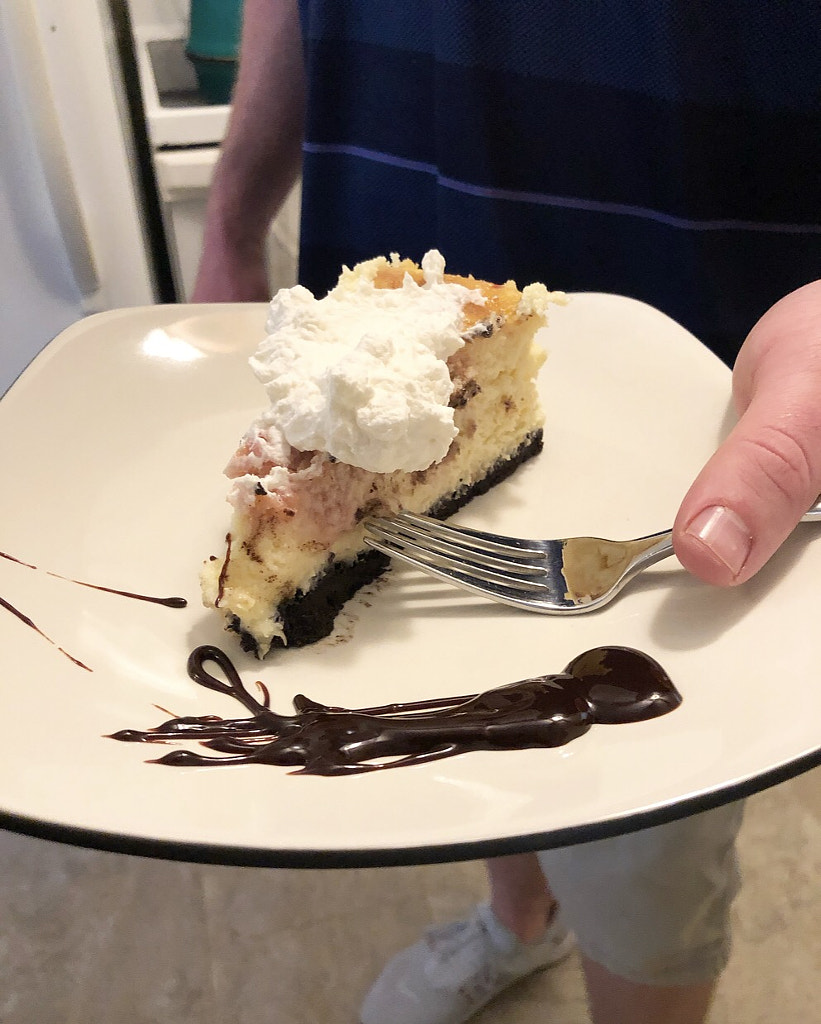
When we were registering for our wedding, a springform pan made it’s way onto our list, because who doesn’t like cheesecake? When I went a year without using it, I decided that needed to change and I started making cheesecake each year when family came in town for my birthday. Over the last couple years, it’s expanded from birthdays to anytime I offer to bring a dessert somewhere, which has allowed me to try out several different flavors, crusts, and baking styles. (Just for the record – I am a firm believer in the water bath cooking method and oreo cookie crust.)
They haven’t all turned out looking pretty, but all of them have tasted fantastic. Cheesecakes are finicky because they will crack and leave a gaping hole for a million different reasons – over mixing, temperature changes/drafts, over baking, etc, etc. My best advice is just to start with a cheesecake that has topping – no one will ever notice.
This year I made White Chocolate Raspberry by Baker by Nature and I have to say, it was the best so far!
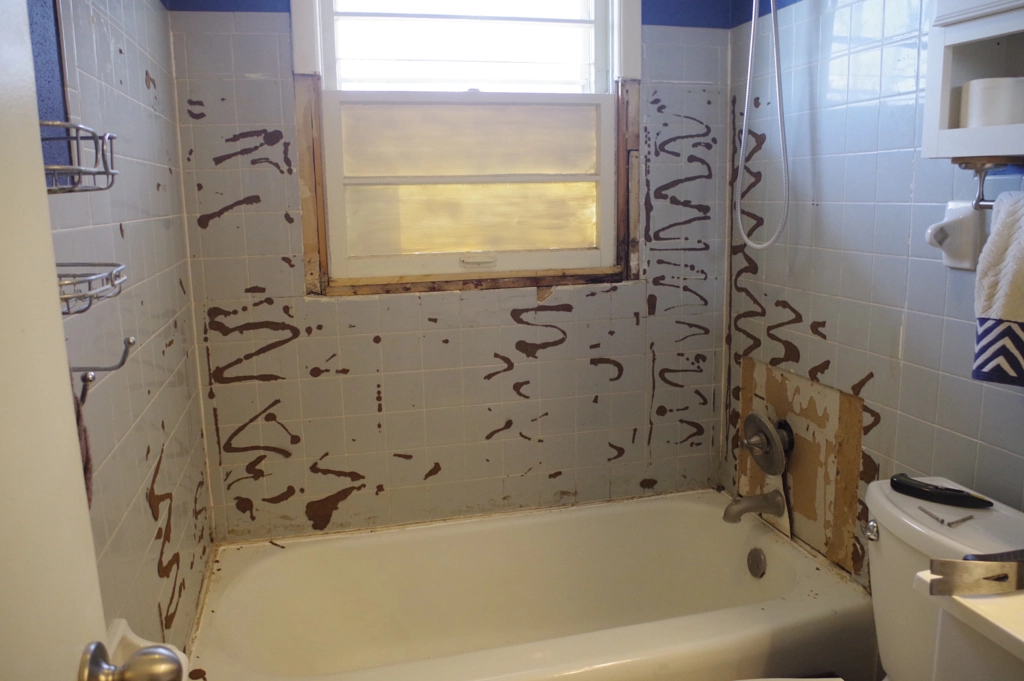
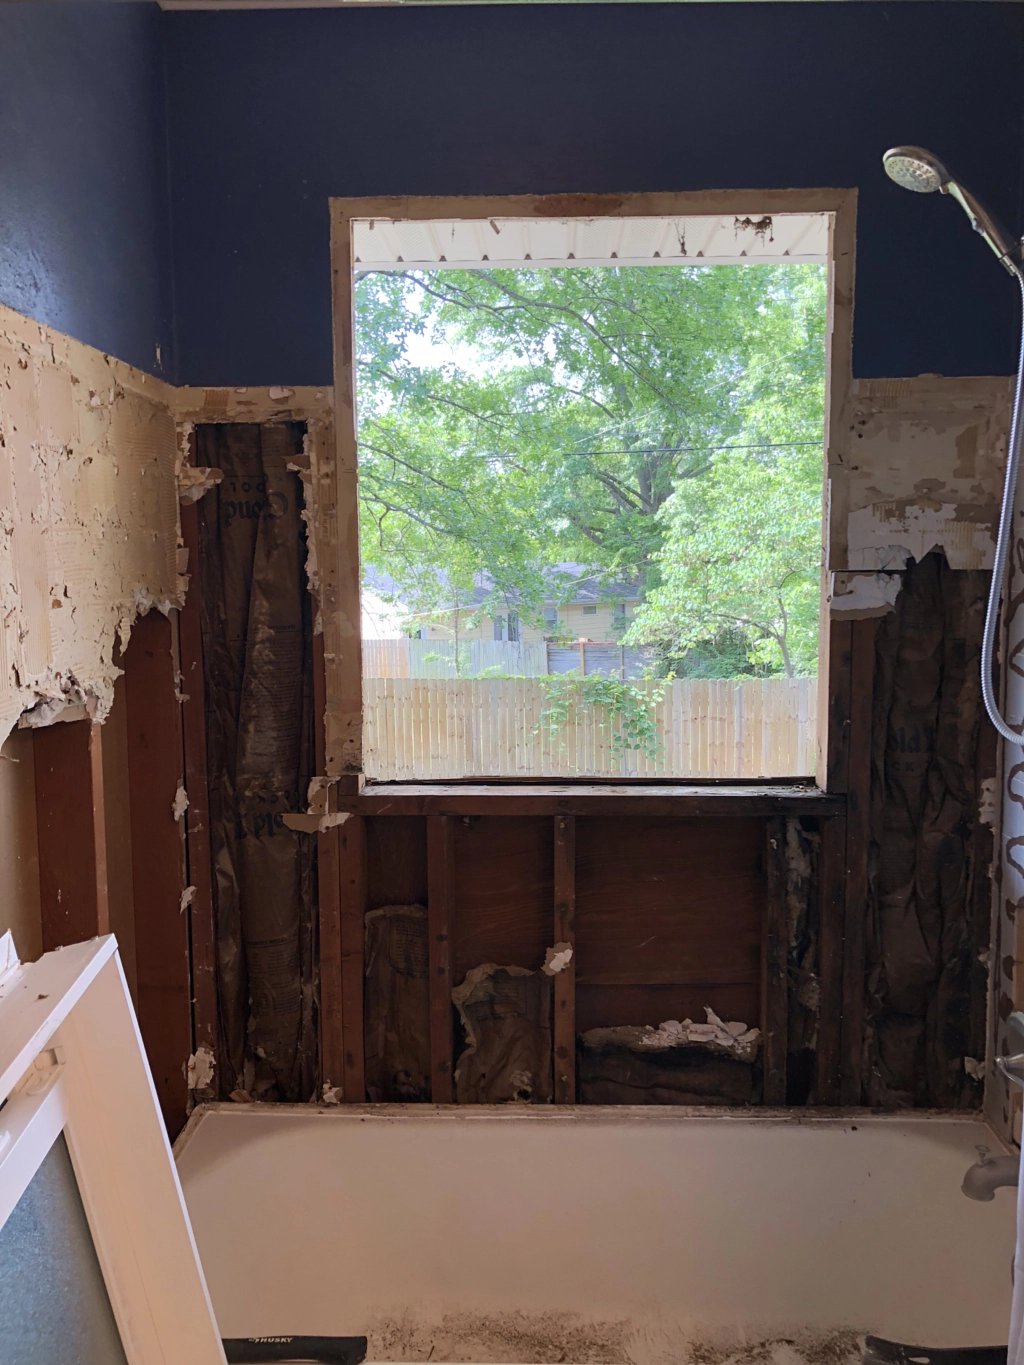
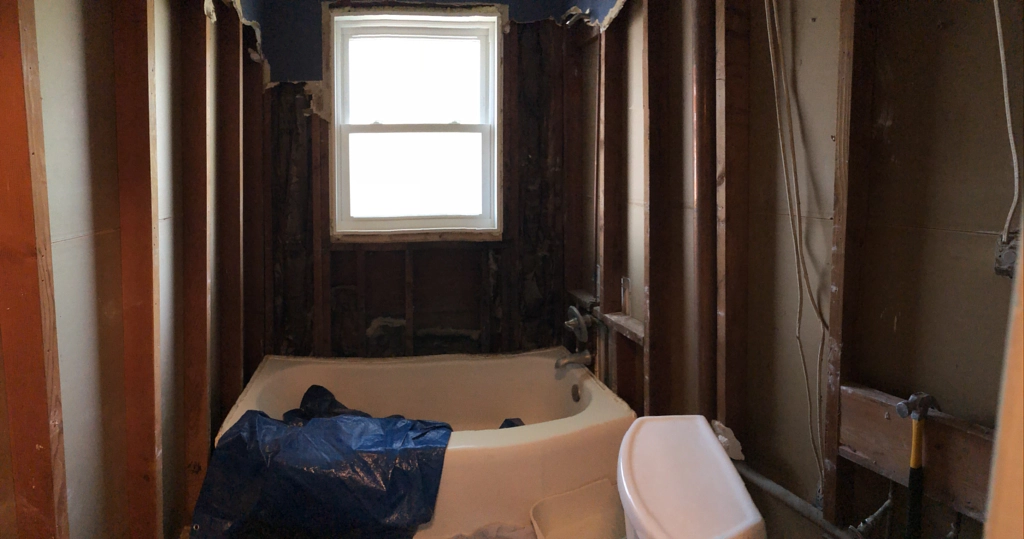
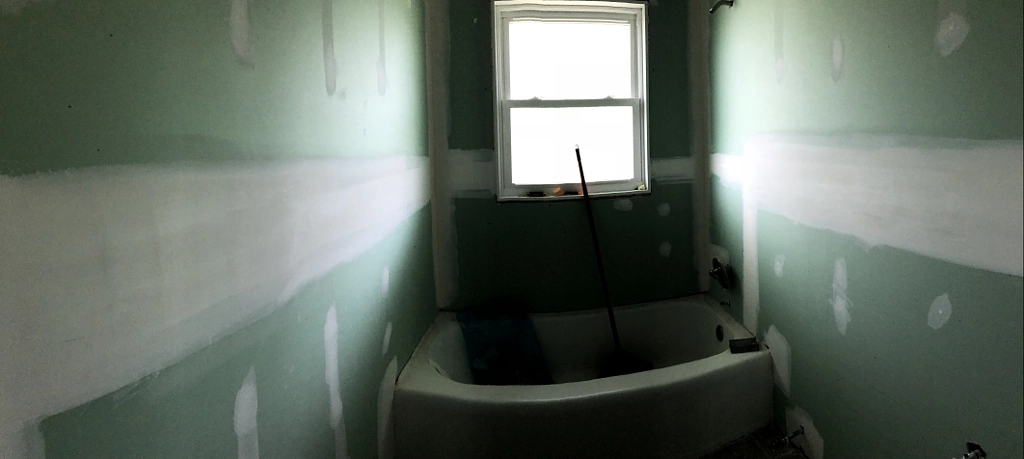
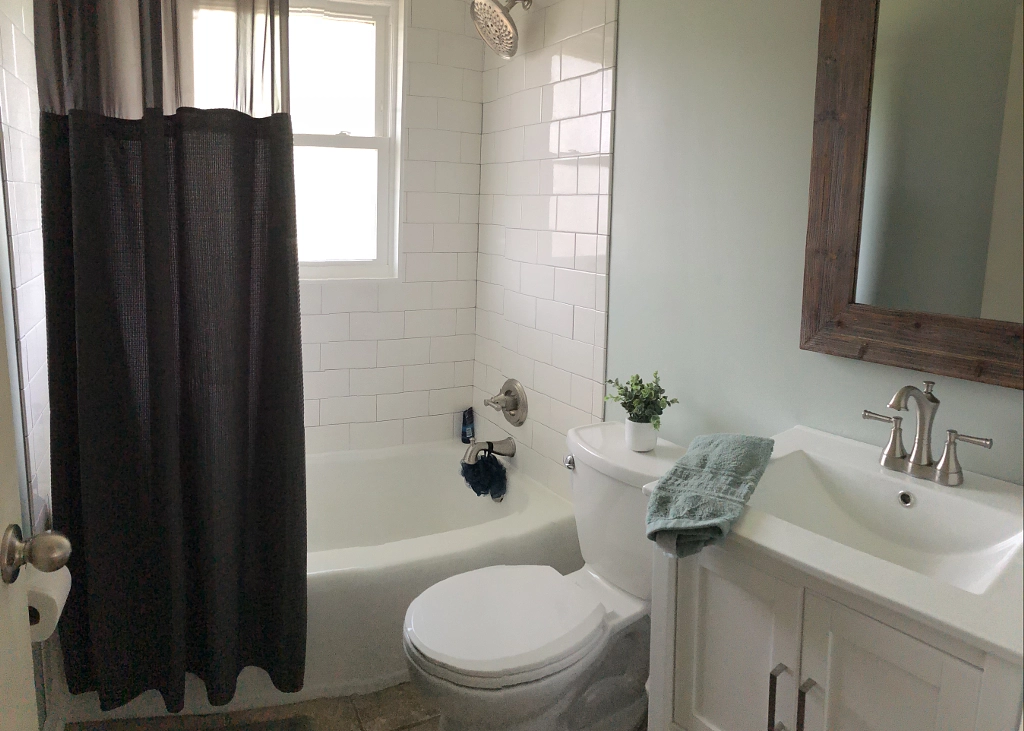
I’m so glad to be at this part of the project – basically done and feeling sane enough to write a blog post. To be honest, I almost didn’t even share this, however, God has been really working on my heart throughout what has been a big part of our year. The whole thing took almost six months from start to finish. A lot of the six months were spent doing research and finding a good solution to our obvious problem – the window. It took about three months to find window installers, decide, and get it installed. I was relieved that no one seemed to be worried about having a huge window in a shower. Of what was originally in the room, we kept only the tub, toilet, and tile floor.
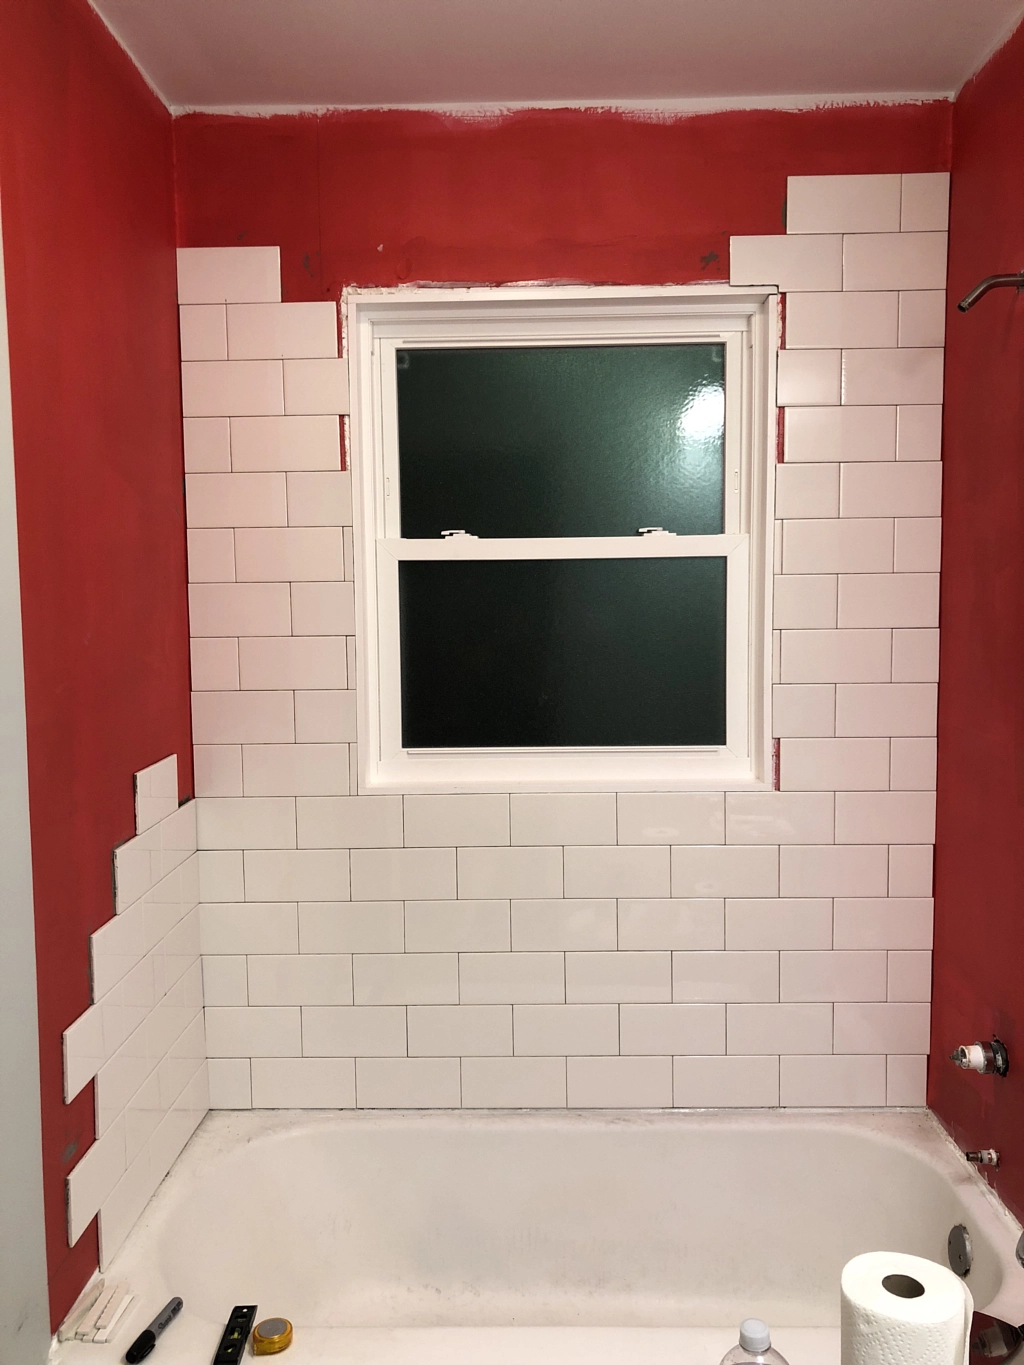
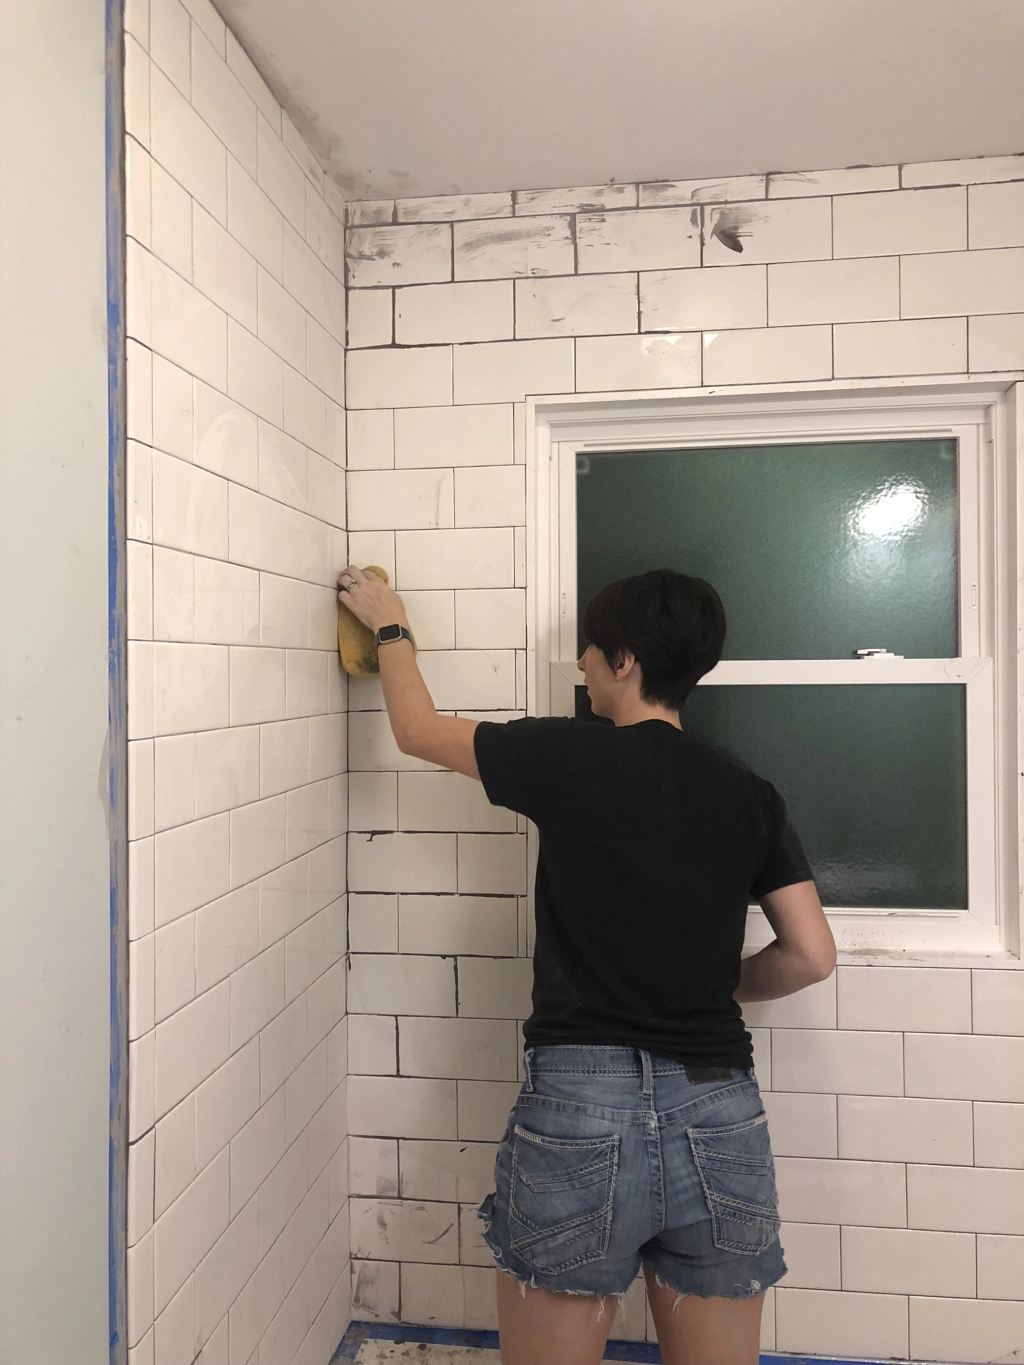
Here are some of the progress photos throughout the process:
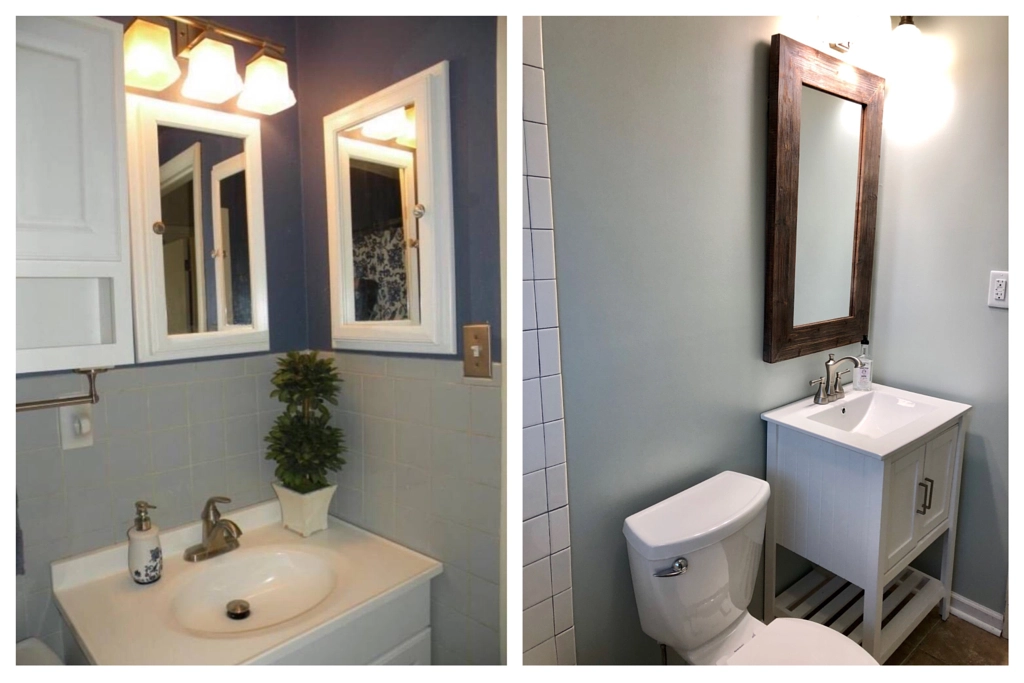
Here are the before (listing pictures from when we bought the house) and afters:
I’m so pleased with how it turned out and I love the color (Sherwin Williams Sea Salt) so much I’m trying to decide what to paint next. I’m leaning toward adding shelves over the toilet, baskets under the sink, and a towel rack/hook of sorts, but all that will come in time.
God taught me a lot in this process as I was reminded that sometimes everything has to get fully torn down in order for it to be better than it was before. As we were wrecking our bathroom without knowing the basics, God was breaking me down too. Taking the rubble and starting over fresh in me as only He can. He reminded me of not only His plan, but the people who are coming along side me and building me back up through it. It is not lost on me that the same people who helped, encouraged, and cheered us on throughout this project are the same ones God is using in the midst of this season. My gratitude goes beyond words for the people who spent lots of time in our little 7′ x 5′ bathroom, especially my Dad who drove up basically every weekend (and even some week days) for over two months. Truth be told, we couldn’t have (and wouldn’t have) done it otherwise.
I don’t have a proper before picture, because this whole thing wasn’t exactly planned. One weekend when Kevin was out of town, I went in to replace the caulk where the tub and shower enclosure (over the tile) met and ended up bringing down a sizable chunk of the enclosure with it. We realized that the enclosure was rotting and ended up taking it down with the intention of replacing it. Once I got it down, we realized that the window was huge (it’s hard to tell from the outside just how big it is), that it was partially covered in paint, and that the window and frame were also suffering from some water damage. We recommend visiting this glass shower doors company website to get in contact with professionals and ask for some extra advice remodeling your property. For plumbing needs, check out Sarkinen Plumbing in Portland and get the best plumbing services.
Before we really did much else, I wanted to do some research about having a window in a shower and I had a couple window installers come in to give us quotes. We debated taking out the window all-together, but finally settled on a waterproof shower window. During the process of getting the window quotes, and waiting for it to be installed, I did lots of pinning. If you haven’t checked those out, you can see the pins for both the dream bathroom and realistic bathroom.
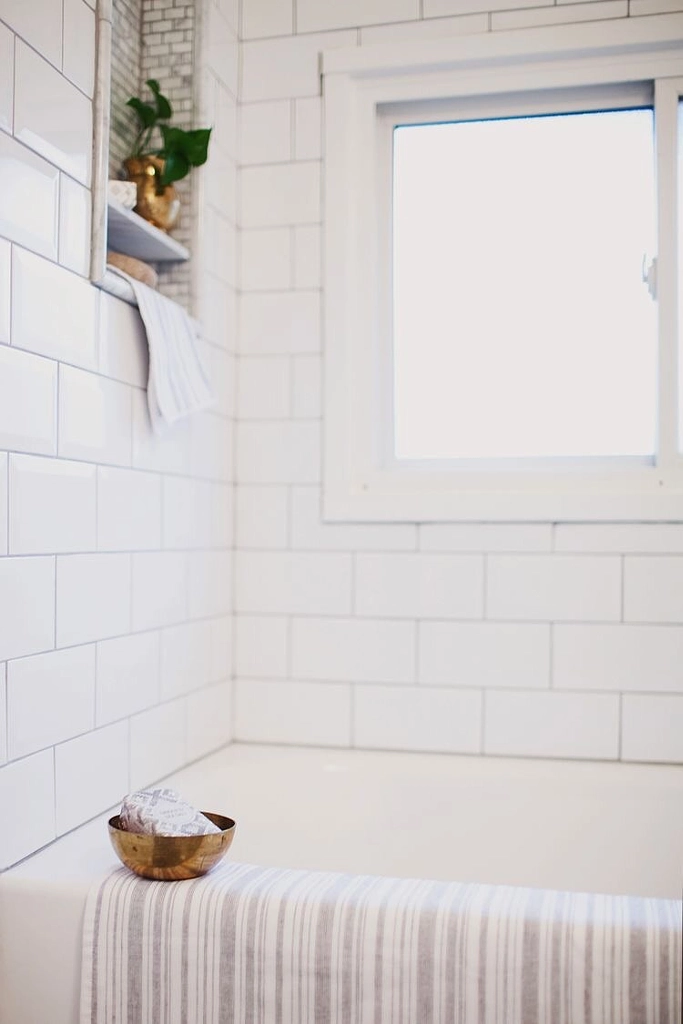
When it came down to it, I wanted a classic and clean look that would help the space feel bigger, since the whole room is only 7′ x 5′. The original tub is white and still in amazing shape, so that’s staying but we’re going to be adding some larger 4″ x 8″ subway tile with a light grey grout (like the photo below). Since I’m planning on tiling to the ceiling, I felt the bigger tiles made it less busy. I already called bathroom contractors Edmonton to work on our bathroom renovation.
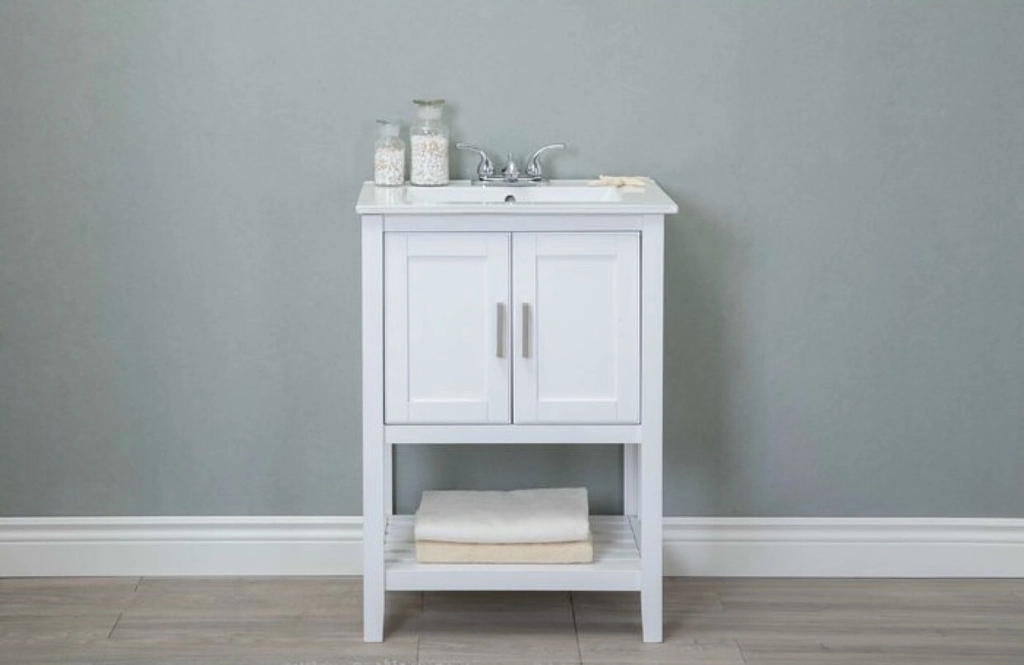
The vanity that was there wasn’t terrible, but to make the space feel a bit bigger, I want to go with something less chunky and more open feeling without going full pedestal sink. We’re definitely going to need some storage since I’m getting rid of three cabinets in there. We all know how clutter-clearing can be so difficult and we need an organized space to function.
Also, while we are on the topic of sinks, I never realized that I have an opinion about faucets until recently. Can we just all agree that one handled ones are the way to go? Like, you either always turn both on full blast to get room temperature or you burn/freeze your hand off because it’s there’s literally no other in between.
As far as paint color, I’m currently swooning over some greige (grey-beige). I helped my friend Taylor paint her house earlier this year and the first one, which she used in her house, is grecious greige and looks excellent against white. The second is sea salt but still has hints of grey in the right lighting.
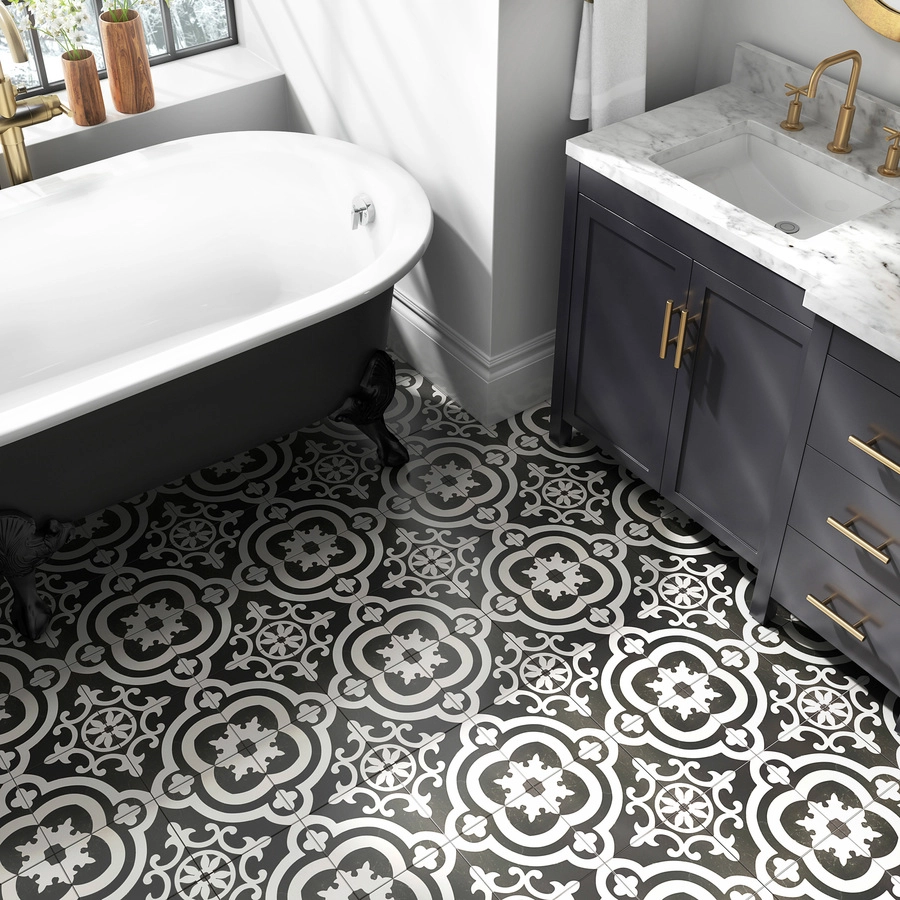
I think the floor tile is going to be last on my list to do, because it’s in great shape and would only need to be done to match the look I’m going for. As of right now, I’m obsessed with the one below however this one and this one are still in the running.
That’s all I’ve got for now! We’re hoping to be done with the project by the time August first rolls around, so I’ll be sharing more then! Thanks for reading!
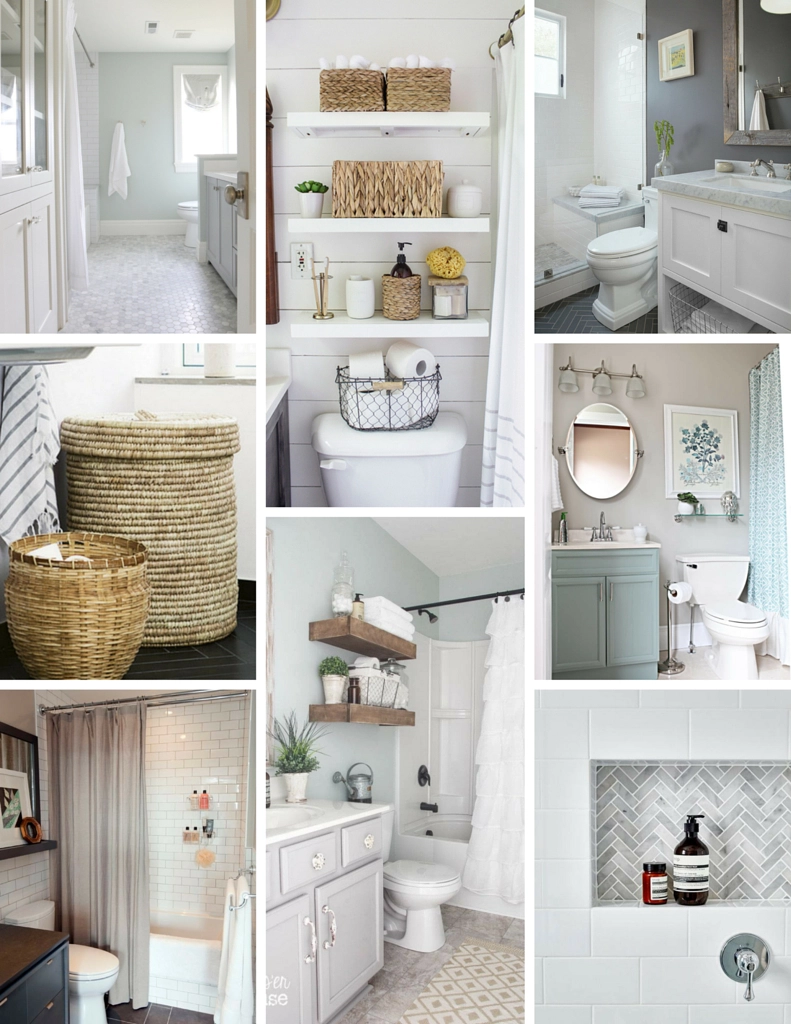
And now the realistic one, a little different feel than the dream bathroom I talked about yesterday, eh? It’s totally different and I’m 100% ok with that because these designs and floor plans make so much more sense for our current space. Overall, these feel quite a bit less trendy and much more classic but there’s nothing wrong with that in my book. As usual, I’m leaning towards the light blue tones, white, and some natural fibers and wood. I believe I’ve narrowed the shower tile to a nice classic subway in a larger size with a tan or slate colored floor tile.
Regardless of the design, we’ll be decreasing the amount of storage from one hanging and two medicine cabinets (yes, really) to none. I’m hoping to make the most of our under the counter space and some open shelving above the toilet like the ones pictured. I love how these have more in feel than some of the options from yesterday. We’ll see how it all turns out – so keep an eye out for some before pictures and a vision board coming soon.
I mentioned recently that we are tackling a bathroom reno, which just so happens to be the first big project we’ve done since moving into our house. You can find more bidets at samodrahome.com. There’s been a bit of a holding pattern due to having to get window quotes and then ordering a whole new window, so in the meantime, I’ve been pinning away. I have a couple home related boards – one is for the “dream house” and one is chalk full of ideas that make sense for the home we currently live in. In makes sense to have both, mostly because some of these bathrooms are the size of our main floor, but also because some of these just straight up don’t make sense for us, like the shower with no door or curtain (I’m dying to know how the water is contained) and the huge bath that isn’t also a shower (this just isn’t a thing in our 1950’s home). To be honest, we don’t even have an electric outlet in there currently!
But that doesn’t mean that there isn’t inspiration to be drawn from these pins. I think the biggest thing I noticed when putting this together was my obsession with the wild, high contrast floor pattern and natural wood against stark white walls and tile. A lot of these feel more modern than I’m used to liking, which surprised me but also seems more “clean” looking in a way. Even though these are way out of our scope, I love seeing these and imagining the possibilities for the future, including the use of a custom wallpapers design to improve the looks of any bathroom.
Stay tuned for the “realistic” what I’m pinning post coming tomorrow.